
Preparare bombe da bagno con i bambini è una di quelle rare attività che sono in parti uguali esperimento scientifico, progetto artistico e gioco sensoriale. L’effervescenza, i colori, l’entusiasmo quando la loro creazione tocca l’acqua — non stanca mai.
Ma ecco il punto: creare con i bambini richiede un approccio diverso rispetto ai progetti da svolgere da soli. Sicurezza, semplicità e divertimento devono convivere. Questa guida ti accompagna in tutto, dalla scelta del primo kit alla risoluzione dei problemi più comuni, così potrai gestire questa attività con sicurezza e senza stress.
Perché un kit per preparare bombe da bagno è il miglior punto di partenza
Cosa include un tipico kit per bombe da bagno adatto ai bambini
Un kit di qualità per realizzare bath bomb elimina le incertezze. La maggior parte dei kit progettati per bambini include bicarbonato di sodio e acido citrico predosati, coloranti sicuri per la pelle, oli profumati, oli vettore (come cocco o mandorla dolce) e un set di stampi dalle forme divertenti.
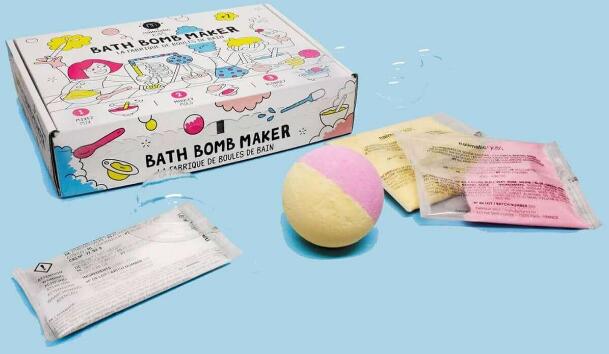
Il vantaggio dei materiali predosati è la riduzione degli errori. Quando gli ingredienti delle bath bomb per bambini sono dosati correttamente fin dall’inizio, si evitano i problemi più comuni — sbriciolamento, espansione o totale mancanza di effervescenza. I bambini ottengono un risultato positivo al primo tentativo, il che li mantiene coinvolti.
Molti kit includono anche flaconi spray, bastoncini per mescolare e semplici schede di istruzioni con immagini. Queste piccole aggiunte fanno una differenza sorprendente quando si gestiscono manine entusiaste.
Kit vs. Approvvigionamento di singoli ingredienti — Confronto tra costi e praticità
Si potrebbe pensare che acquistare gli ingredienti separatamente faccia risparmiare. In pratica, di solito è vero il contrario — soprattutto per un primo progetto. Ecco come si confrontano i due approcci:
| Fattore | Kit completo | Approvvigionamento individuale |
|---|---|---|
| Costo medio | $20–$35 | $40–$60+ |
| Tempo di preparazione | 5 minuti | 30–60 minuti |
| Verifica della sicurezza per i bambini | Preselezionato | Richiede ricerca |
| Spreco di ingredienti | Minimo | Da moderato a elevato |
L'approvvigionamento individuale ha senso una volta che l'hai fatto alcune volte e sai quali profumi e colori piacciono ai tuoi bambini. Ma per un primo tentativo, un kit ti porta dall'apertura della confezione alla realizzazione degli stampi in meno di un'ora.
Principali caratteristiche da cercare in un kit (adatto all'età, non tossico, varietà di stampi)
Non tutti i kit sono uguali. Cerca queste caratteristiche prima dell'acquisto:
- Fascia d'età — I kit classificati 6+ in genere includono stampi più piccoli e passaggi più complessi. Per i bambini più piccoli (4–5), cerca kit con stampi più grandi e meno ingredienti.
- Certificazione atossica — I coloranti devono essere polveri di mica sicure per la pelle o coloranti alimentari. Gli oli profumati devono essere privi di ftalati.
- Varietà di stampi — I bambini perdono rapidamente interesse se ci sono solo sfere. I kit che offrono stelle, animali o cuori mantengono viva la creatività.
- Istruzioni chiare — Le guide illustrate funzionano meglio per i bambini più piccoli.
Ingredienti essenziali per bombe da bagno per bambini — La sicurezza prima di tutto
Panoramica degli ingredienti di base (bicarbonato di sodio, acido citrico, oli vettore)
L'effervescenza di una bomba da bagno deriva da una semplice reazione acido-base. Quando l'acido citrico incontra il bicarbonato di sodio nell'acqua, si formano bolle di anidride carbonica — quella soddisfacente esplosione che i bambini adorano.
Il bicarbonato di sodio (bicarbonato di sodio) ammorbidisce anche l'acqua e lenisce la pelle. L'acido citrico fornisce la controparte reattiva. Gli oli vettore come cocco, mandorla dolce o olio di vinaccioli legano la miscela e idratano la pelle durante il bagno.
Per le formulazioni per bambini, utilizzare sempre bicarbonato di sodio di grado alimentare e acido citrico di grado cosmetico. La differenza di purezza è importante per la pelle sensibile dei più piccoli.
Coloranti e profumazioni sicuri per i bambini — Cosa usare e cosa evitare
È qui che la consapevolezza della sicurezza diventa fondamentale. Non tutto ciò che sembra divertente in un negozio di articoli creativi è adatto all'acqua del bagno di tuo figlio.
| Categoria | Opzioni sicure | Evitare |
|---|---|---|
| Coloranti | Polvere di mica, colorante alimentare | Coloranti lake sintetici, glitter per hobby creativi |
| Fragranza | Olio essenziale di lavanda, olio essenziale di arancia dolce, fragranza alla vaniglia | Eucalipto, menta piperita (sotto i 6 anni), oli essenziali non diluiti |
| Extra | Petali di fiori essiccati, glitter biodegradabile | Glitter in poliestere, piccoli inserti giocattolo (rischio di soffocamento sotto i 3 anni) |
Una buona regola: se non lo metteresti direttamente sulla pelle di tuo figlio, non scioglierlo nell’acqua del suo bagno. Gli oli essenziali devono sempre essere diluiti — in genere con una concentrazione dello 0.5% o inferiore per i bambini sotto i 6 anni.
Consapevolezza sugli allergeni e protocollo di patch test
Prima che il tuo bambino utilizzi qualsiasi bomba da bagno fatta in casa, esegui un semplice patch test. Applica una piccola quantità della miscela sciolta sull'avambraccio interno. Attendi 24 ore. Se non compaiono arrossamento, prurito o irritazione, puoi procedere tranquillamente.
Gli allergeni comuni negli ingredienti delle bombe da bagno includono oli di frutta a guscio (mandorla, noce), alcuni estratti botanici e alcuni composti profumati. Se il tuo bambino ha sensibilità note, sostituisci l'olio di mandorla con olio di girasole o di vinaccioli, ed evita completamente le fragranze per il primo lotto.
Ricetta fai-da-te passo dopo passo per bombe da bagno per bambini
Preparazione dell'area di lavoro e strumenti necessari
Prepara tutto prima che i bambini si siedano al tavolo. Ti serviranno:
- Ciotole capienti per mescolare (una per colore, se ne prepari più di uno)
- Un setaccio o colino a maglia fine
- Flacone spray riempito con amamelide o alcol denaturato
- Tazze e cucchiai dosatori
- Teglie rivestite per l'asciugatura
- Guanti monouso (l'acido citrico può irritare piccoli tagli)
Apri una finestra o accendi un ventilatore. La polvere di acido citrico è innocua ma può solleticare naso e gola durante la miscelazione. Assegna ai bambini più piccoli il compito di mescolare e pressare; i più grandi possono occuparsi di misurare e spruzzare.
Mescolare gli ingredienti secchi
Il rapporto classico per una ricetta fai-da-te delle bombe da bagno è di 2 parti di bicarbonato di sodio e 1 parte di acido citrico. Per una quantità standard, sono 1 tazza di bicarbonato di sodio e ½ tazza di acido citrico.
Setaccia entrambi gli ingredienti attraverso il colino a maglia fine nella ciotola. Questo elimina i grumi e garantisce un'effervescenza uniforme in seguito. Lascia che i bambini si alternino a mescolare il composto secco con la frusta — è un'attività a basso rischio e li fa sentire coinvolti fin dall'inizio.
Aggiungere gli ingredienti liquidi senza provocare un'effervescenza prematura
Questo è il passaggio in cui la maggior parte dei principianti sbaglia. Se aggiungi gli ingredienti liquidi troppo velocemente, il composto inizierà a frizzare nella ciotola invece che nella vasca.
Unisci 2 cucchiai di olio vettore con ½ cucchiaino di olio profumato in una tazzina. Poi — ed è fondamentale — spruzza l'amamelide dal flacone in 2–3 spruzzi alla volta, mescolando continuamente. Continua fino a quando il composto resta compatto quando viene stretto, come la sabbia bagnata in spiaggia.
Se si sbriciola quando viene pressato, aggiungi un altro spruzzo. Se risulta appiccicoso o inizia a espandersi, hai aggiunto troppo liquido. Aggiungi un cucchiaio di bicarbonato di sodio per compensare.
Colorare, profumare e aggiungere divertenti elementi extra
Per i coloranti, inizia con 2–3 gocce di colorante alimentare o ¼ cucchiaino di polvere di mica per tazza di composto. Puoi sempre aggiungerne altro — non puoi toglierlo.
Elementi extra divertenti che i bambini adorano: glitter biodegradabile aggiunto alla fine, boccioli di lavanda essiccati o un piccolo nucleo a contrasto di colore nascosto al centro. Per effetti a strati, dividi il composto in porzioni, colora ciascuna in modo diverso e pressale nello stampo in strati alternati.
Mantieni bassi i livelli di profumazione per i bambini. Da tre a cinque gocce di olio essenziale per quantità sono più che sufficienti. Il loro olfatto è più sensibile del nostro e, in questo caso, davvero meno è meglio.
Modellare, compattare e asciugare — per ottenere la forma perfetta
Compatta saldamente il composto nello stampo — premilo davvero bene. Un riempimento poco compatto è la principale ragione per cui le bombe da bagno per bambini si sbriciolano. Se utilizzi uno stampo sferico in due pezzi, riempi leggermente in eccesso ciascuna metà, quindi unisci le metà esercitando una pressione con un movimento rotatorio.
Attendi 5–10 minuti prima di sformare con attenzione. Per gli stampi in silicone, piega delicatamente i bordi per facilitare il rilascio. Per gli stampi in metallo, di solito basta un leggero colpetto sul piano di lavoro.
Lascia asciugare le bombe da bagno su un vassoio rivestito per 24–48 ore in un luogo fresco e asciutto. Evita i bagni — l'umidità attiverà l'effervescenza prematuramente. Una volta completamente indurite, conservale in contenitori ermetici oppure avvolgile singolarmente nella pellicola trasparente.
Stampi e materiali per bombe da bagno — scegliere gli strumenti giusti
Confronto tra i tipi di stampo (silicone, metallo, plastica)
La scelta di stampi e materiali per bombe da bagno influisce direttamente su quanto questo progetto sarà semplice (o frustrante) da realizzare con i bambini. Ecco un rapido confronto:
- Stampi in silicone — Flessibili, facili da sformare, lavabili in lavastoviglie e disponibili in innumerevoli forme. Ideali per principianti e bambini piccoli.
- Stampi in metallo — Classica forma sferica, resistenti, ma richiedono maggiore tecnica per essere sformati senza rompersi. Più adatti ai bambini più grandi (8+).
- Stampi in plastica — Economici e leggeri, ma possono deformarsi nel tempo e talvolta aderire al composto. Adeguati per un uso occasionale.
Per le famiglie che stanno appena iniziando, il silicone è chiaramente la scelta migliore. La sua flessibilità rende il processo più semplice, con meno bombe da bagno rotte e meno lacrime.
Oltre la sfera — forme creative di stampi che i bambini adorano
Le sfere sono un classico, ma i bambini si entusiasmano per forme che raccontano una storia. Dinosauri, unicorni, conchiglie, ciambelle, stelle e razzi stimolano tutti l'immaginazione durante il bagno.
Gli stampi speciali in silicone sono ampiamente disponibili online a $5–$15 per set. Anche gli stampi per la decorazione di torte funzionano perfettamente — assicurati solo che siano larghi almeno 2 inches, così la bath bomb avrà massa sufficiente per frizzare correttamente.
Risoluzione dei problemi comuni delle bath bomb per bambini
Perché le bath bomb si sbriciolano, si espandono o non frizzano
Tre problemi rappresentano il 90% degli insuccessi delle bath bomb:
- Sbriciolamento — Ingrediente umido insufficiente, oppure il composto non è stato pressato abbastanza saldamente. Soluzione: aggiungi un altro spruzzo di witch hazel e compatta con maggiore pressione.
- Espansione (effetto "muffin top") — Troppo liquido ha attivato la reazione in anticipo. Soluzione: riduci il witch hazel la prossima volta e lavora più rapidamente una volta aggiunti gli ingredienti umidi.
- Frizzio debole o assente — L'acido citrico ha assorbito umidità dall'aria (comune nei climi umidi) oppure il rapporto non è corretto. Soluzione: usa acido citrico fresco e verifica il tuo rapporto 2:1.
Come adattare le ricette ai climi umidi o secchi
L'umidità è il nemico silenzioso della preparazione delle bath bomb. In ambienti umidi (oltre il 60% di umidità relativa), riduci il witch hazel della metà e lavora in una stanza con aria condizionata. Il composto assorbirà l'umidità ambientale, quindi avrai bisogno di meno liquido aggiunto.
Nei climi molto secchi, potresti aver bisogno di uno o due spruzzi in più. Il composto si asciuga più rapidamente, quindi lavora velocemente una volta che inizi ad aggiungere gli ingredienti umidi. Anche il tempo di asciugatura si riduce — controlla le tue bath bomb dopo 18 ore.
Varianti creative per il tuo tutorial sulle bath bomb fatte in casa
Bath bomb che si illuminano al buio e cambiano colore
Vuoi aumentare l'effetto wow? La polvere fosforescente (luminescente) sicura per la pelle può essere mescolata agli ingredienti secchi in una quantità di circa 1 cucchiaio per lotto. Carica le bombe finite sotto una luce intensa, quindi mettile nella vasca con le luci del bagno spente. I bambini ne vanno assolutamente matti.
I pigmenti termocromici cambiano colore con la temperatura. Aggiungi ½ cucchiaino alla miscela per ottenere bombe da bagno che passano da un colore all'altro a contatto con l'acqua calda. Questi pigmenti sono disponibili in formulazioni di grado cosmetico sicure per il contatto con la pelle.
Bombe da bagno con sorpresa nascosta (giochi, messaggi, colori)
La tecnica della "sorpresa all'interno" è semplice: riempi lo stampo a metà, inserisci al centro un piccolo giocattolo impermeabile o un messaggio arrotolato, quindi compatta sopra il resto della miscela. Man mano che la bomba si dissolve, la sorpresa si rivela.
Per i bambini sotto i 3 anni, evita del tutto di inserire giocattoli a causa del rischio di soffocamento. Inserisci invece un nucleo di colore a contrasto — una piccola sfera di miscela di un colore diverso che crea un'esplosione di colore d'effetto mentre lo strato esterno si dissolve.
Idee stagionali e a tema (festività, compleanni, gadget per feste)
Le bombe da bagno sono fantastici regali e gadget per feste. Ecco alcune idee per iniziare:
- Halloween — Strati neri e arancioni con stampi a forma di ragno
- Festività invernali — Stampi a fiocco di neve con profumo di menta piperita (per bambini dai 6 anni in su) e mica argentata
- Compleanni — Abbina i colori al tema della festa, confeziona in sacchetti di cellophane con un nastro
- San Valentino — Stampi a cuore con vortici rosa e rossi, delicata fragranza alla rosa
Confeziona le bombe finite in piccoli sacchetti di organza o scatole trasparenti con un'etichetta scritta a mano. I bambini adorano regalare qualcosa che hanno realizzato con le proprie mani.
Domande frequenti
A che età i bambini possono aiutare in sicurezza a fare le bath bomb?
La maggior parte dei bambini può partecipare a partire dai 4 anni circa con la stretta supervisione di un adulto. A questa età, possono mescolare gli ingredienti secchi, pressare il composto negli stampi e scegliere i colori. Dagli 8 anni, la maggior parte dei bambini riesce a occuparsi delle misurazioni, della nebulizzazione e a lavorare in modo più autonomo. La manipolazione della polvere di acido citrico e degli oli essenziali dovrebbe essere riservata ai bambini più grandi o agli adulti, poiché la polvere di acido citrico irrita gli occhi e gli oli concentrati possono sensibilizzare la pelle.
Le bath bomb fatte in casa sono sicure per la pelle dei neonati?
Per neonati e bambini piccoli sotto i 2 anni, evita completamente fragranze e coloranti. Una bath bomb semplice a base di bicarbonato di sodio e acido citrico con una piccola quantità di olio di cocco è abbastanza delicata per la pelle della maggior parte dei bambini. Tuttavia, consulta sempre prima il pediatra se il tuo bambino ha eczema o altre condizioni cutanee. I dermatologi pediatrici consigliano generalmente di aspettare fino ai 2 anni prima di introdurre qualsiasi prodotto da bagno profumato.
Quanto durano le bath bomb fatte in casa?
Se conservate correttamente, le bath bomb fatte in casa durano fino a 6 mesi. Tienile avvolte singolarmente nella pellicola trasparente o sigillate in contenitori ermetici, lontano dall'umidità e dalla luce solare diretta. I segnali di deterioramento includono una forma appiattita, una superficie polverosa o un'effervescenza visibilmente più debole. Se hanno un odore alterato o appaiono scolorite, è il momento di prepararne una nuova quantità.
Le bath bomb possono ostruire gli scarichi?
Le bath bomb semplici (bicarbonato di sodio, acido citrico, oli) non ostruiscono gli scarichi. Anzi, il bicarbonato di sodio può aiutare a mantenerli liberi. I problemi derivano dagli ingredienti solidi aggiunti: petali di fiori secchi, particelle di glitter grandi o inserti non disciolti. Usa un raccogli-scarico o un sacchetto a rete se la tua ricetta include ingredienti botanici e, quando possibile, scegli sempre extra finemente macinati e idrosolubili.
Qual è il miglior kit per fare bath bomb per principianti?
Cerca kit che includano tutti gli ingredienti base già dosati, almeno 2–3 forme di stampi, coloranti sicuri per la pelle e istruzioni passo dopo passo con foto. Dai priorità ai kit con certificazioni di atossicità e indicazioni adatte all'età. I kit che includono un flacone spray e strumenti per la miscelazione ti evitano di dover cercare tutto in cucina. Leggi le recensioni soprattutto dei genitori che hanno realizzato questi prodotti con i bambini — il loro feedback sul livello di disordine e sulla chiarezza delle istruzioni è preziosissimo.
Come posso fare bath bomb senza acido citrico?
Il cremor tartaro funziona come sostituto con un rapporto di 1:1 (sostituisci l'acido citrico con la stessa quantità di cremor tartaro). L'effervescenza sarà più delicata e lenta — più una lieve frizzantezza che un'eruzione scenografica. Alcuni produttori utilizzano anche amido di mais miscelato con cremor tartaro per una consistenza più uniforme. Il compromesso è un minore impatto visivo, ma la bath bomb si dissolve comunque piacevolmente e rilascia efficacemente colore e profumo.